

Å hekle på glidelås er så lettvindt.
Denne lille mappa kan bli det meste.
Teknikken er veldig grei å kunne.
To crochet directly onto the zipper is easy.
This idea can turn into anything you want.
The technic is good to know.

Dette er hva du trenger.
Det garnet du ønsker, glidelås så lang du ønsker,
tykk nål og heklekrok som passer garnet.
This is what you need.
Your yarn of choice, a zipper at your length,
thick needle and a hook to match your yarn.
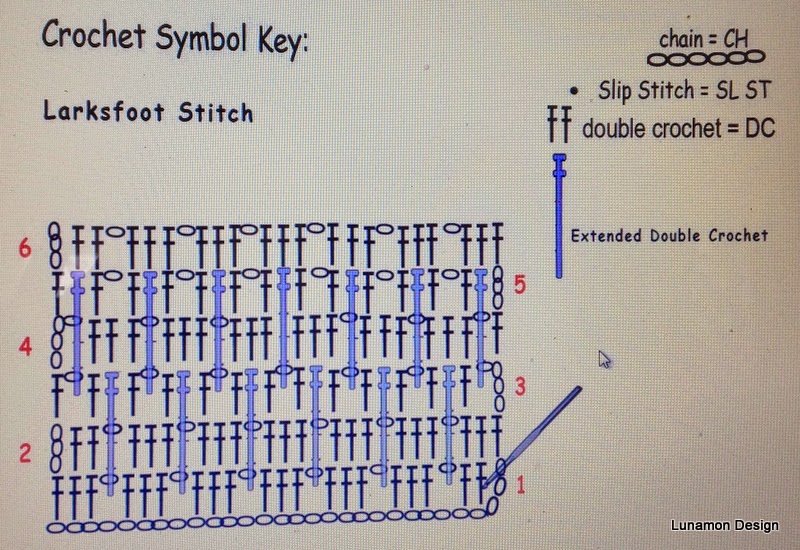
Jeg har brukt denne masken, aner ikke hva den heter på norsk.
Derfor en norsk oversettelse.
Chain - luftmaske
Slip stitch - kjedemaske
Double crochet - stav
Extended double crochet - en lang stav som går ned i luftmaskebuen to rader under.
I have used this stitch, don't know the Norwegian name for it.
Therefor a translation for my Norwegian readers.

Jeg heklet fastmasker rundt glidelåsen.
Jeg brukte ei tykk nål for å lage hull.
Ca 5 mm mellom hullene passet mitt garn og min krok.
Single crochet ( US) around the zipper.
I used a thick needle to make it easier.
About 5mm between the holes was ok for my yarn and hook.

I hjørnene laget jeg 3 fastmasker i ett hull,
en fm rett ved glidelåsen, en på andre siden og 3 i hjørnet igjen.
In the corner I made 3 single crochet (US) in the same hole,
one sc close to the zipper, one after the zipper and then 3 sc in the corner.

Fest første omg med en kjedemaske når du kommer rundt.
Make a slip stitch to fasten off the first round.

2. omg - start med 3 lm ( 1 stav) + 2 st, 1 lm.
Jeg heklet staver i hver fastmaske fra forrige omg. ( ikke som på diagrammet.)
Tilpass sånn at det passer rundt hele glidelåsen.
2. round. Start with chain 3 (1 DC) + 2 dc, chain 1.
I made a dc in each sc from the last round. ( Not as shown in the chart )
Adjust so that it fits the zipper.

3. 3 staver + 1 lm lik som forrige runde, men da hopp over lm.
Stav over stav, som diagrammet.
3. 3 dc + chain 1, as last round.
Dc over dc, as in the chart.

4. 1 st i stav nr 3, en lang stac ned i lm hullet i den rosa omg.
hekle som vanlig. 1 st i stav nr 1 i gruppen.
4. 1 dc in dc nr 3, one extended dc on the chain bow in the pink round,
crochet as normal, then one dc in the first dc after the chain bow.

Grønn omg gjøres som den rosa og lilla.
Legg merke til at hullene til den lange staven forskyver seg.
Ny rosa omg, se forklaring til bildet over.
Make the green round as the pink and purple one from earlier.
Notice the chain bow.
New pink round, instructions under the last photo.

Så stor ville jeg lage denne.
This is how big I wanted to make it.

Vreng denne, se trådene.
Husk å åpne glidelåsen ;o) Jeg gjorde det ikke...
Turn outside inn, notice all the ends.
Make sure you open the zipper. I didn't...

Plasser riktig og hekle en rad fastmasker hvor du hekler sammen begge sidene.
Fest alle tråder.
Place both sides correctly and single crochet one round
to connect both sides.
Weave inn all the ends.

Vreng den igjen.
Turn.

Sminkepung / pengebok / ladekabler.
For makeup / Wallet / Charge cables..

Lag den så stor eller liten du ønsker.
Bruk glidelås som passer til ditt ønske.
Make it as big or small as you want,
use a zipper of your choice.
I have had so many hits on this post from USA the past few days
I would really love if someone told me where it is shared.
Some days almost 1000 hits.
Når du blogger eller legger ut på nettet,
vær snill og link meg i innlegget.
When you blogg or put yours online,
please link me.
I have had so many hits on this post from USA the past few days
I would really love if someone told me where it is shared.
Some days almost 1000 hits.
Når du blogger eller legger ut på nettet,
vær snill og link meg i innlegget.
When you blogg or put yours online,
please link me.
Jeg lager disse gratis, men om du ønsker å bidra til mitt arbeide,
er det en donate knapp oppe til høyre på siden min.

I do this work for free and I enjoy it.
But if you want to donate 1$ for my time,
you can find a donate button on the right side of my page.
Kos dere.
Happy hooking.
I love this tutorial! I have never seen anyone tell how to insert a zipper using crochet, and I'm interested and exited to try this. I need to go buy a zipper first, but then I will be trying it. Thank you!! Your little purse is cute!
SvarSlettThank you for your kind words Pammy. Thought I had to try it and it worked out perfectly.
SlettLet me know when you try :)
Wow, what a fantastic idea! I never did something with zippers up to now because I was unsure about the sewing. But this is a brilliant solution! And it looks very pretty ♥. Many thanks for sharing!!
SvarSlettGreetings, Nata
Clever!!!!!
SvarSlettthank you for sharing, xxxx Ale
Thank you so much
SlettGorgeous tutorial, Monica, and very clever color combo. I love this stitch too. Kind regards! :-)
SvarSlettThank you so much for this idea. I have made holes with a needle in cloth, but have never tried it with a zipper. This is clever.
SvarSlettThank you so much :)
SlettSo happy you shared this with us at our Yarn Fanatic Linky Party! Now that I am seeing it more clearly, I have noticed it's the Larksfoot pattern. We had another crocheter share a blanket she made with the pattern - I had not seen it previously. I love the look it gives.
SvarSlettI also love the photo tutorial showing how to crochet into the zipper - fantastic! I will be pinning this cute little purse onto a few of my boards, and looking forward to trying it soon!
Thank you for sharing at our Yarn Fanatic Linky Party! I will be sharing this purse with my EyeLoveKnots Facebook Fans tomorrow, late afternoon.
Alexandra
EyeLoveKnots.blogspot.com
Thank you so much for your nice words.
SlettWhy on earth have I never thought of starting at the zipper??!! I've always been struggling sewing the zipper into bags and purses AFTER finishing the crocheting. This way round ist much easier! Thank you, dear Monica!
SvarSlettThank you so much. Yes I love the idea of it.
SlettAnd it makes the work so much easier.
Thank you so much for this idea and sharing the information! If you are okay with it I will put in my blog to yours to show my friends who taught me how to put a zipper in my crochetproject ;-)
SvarSlettI meant: I will put a link in my blog to yours ;-)
SlettThank you so much, I am glad to be able to help you.
SlettA link back to me will be greatly apreciated.
Hello! I really appreciate you sharing at our Yarn Fanatic Party! Since our current party is a long one, I decided to put together a collection to share. This is my first round up, and includes Purses, Bags and Cases shared out our previous Yarn Fanatic Parties. Thank you for your support, and for being a part! You can find it here: http://eyeloveknots.blogspot.com/2015/08/20-yarn-tastic-purses-bags-cases-yarn.html.
SvarSlettAlexandra
EyeLoveKnots.blogspot.com
Thanks for the pictures showing how to crochet onto the zipper! I saw your post on the Linky Ladies Link Party - not sure if that's where all the rest of the traffic is coming from, but that's at least where I came from!
SvarSlettso, so inteligent congrats
SvarSlettThe idea is on Pinterest and is circulating there...that's whereI saw it. Nicely done. Thanks!
SvarSlettGreat tutorial! I'm pinning this. I want to crochet a zippered pouch soon!
SvarSlettNavy Wifey Peters @ The Submarine Sunday Link Party
yozgat
SvarSlettsivas
bayburt
van
uşak
TGU
https://titandijital.com.tr/
SvarSlettmersin parça eşya taşıma
osmaniye parça eşya taşıma
kırklareli parça eşya taşıma
tokat parça eşya taşıma
HGF
45A55
SvarSlettElazığ Lojistik
Urfa Lojistik
Ağrı Evden Eve Nakliyat
Trabzon Parça Eşya Taşıma
Ünye Mutfak Dolabı
Çerkezköy Oto Lastik
Ağrı Parça Eşya Taşıma
Denizli Parça Eşya Taşıma
Manisa Şehir İçi Nakliyat
61013
SvarSlettÇerkezköy Kombi Servisi
Tunceli Evden Eve Nakliyat
Çankaya Parke Ustası
Bingöl Parça Eşya Taşıma
Niğde Parça Eşya Taşıma
Muğla Evden Eve Nakliyat
Bayburt Evden Eve Nakliyat
Ünye Organizasyon
Çerkezköy Oto Boya
F345D
SvarSlettOsmaniye Şehirler Arası Nakliyat
Hatay Evden Eve Nakliyat
Ardahan Şehirler Arası Nakliyat
Gölbaşı Boya Ustası
Keçiören Boya Ustası
Kütahya Lojistik
Kırıkkale Şehirler Arası Nakliyat
Etlik Fayans Ustası
Bibox Güvenilir mi
0CBE1
SvarSlettDüzce Evden Eve Nakliyat
Mersin Lojistik
MEME Coin Hangi Borsada
Çanakkale Şehir İçi Nakliyat
Sakarya Parça Eşya Taşıma
Amasya Şehir İçi Nakliyat
İstanbul Şehir İçi Nakliyat
Maraş Evden Eve Nakliyat
Sakarya Şehirler Arası Nakliyat
20BDB
SvarSlettAdıyaman Şehirler Arası Nakliyat
Trabzon Lojistik
Tekirdağ Parke Ustası
Okex Güvenilir mi
Ünye Halı Yıkama
Ağrı Lojistik
Kırklareli Parça Eşya Taşıma
Ordu Parça Eşya Taşıma
Bilecik Evden Eve Nakliyat
B4F72
SvarSlettreferanskodunedir.com.tr
FCBAE
SvarSlettBinance Madenciliği Nedir
Görüntülü Sohbet
Sweat Coin Hangi Borsada
Hexa Coin Hangi Borsada
Gate io Borsası Güvenilir mi
Telegram Görüntüleme Satın Al
Coin Kazanma
Twitter Retweet Satın Al
Coin Madenciliği Nedir